Got a weekend to spare? A budding do-it-yourself type? Summer Times, in conjunction with Mitre 10, will show you how to build a raised vegetable garden . . .
If you want to grow the biggest, healthiest, fastest-growing vegetables, build yourself a raised vegetable garden.
Because everything’s contained, you can fill your raised garden up with all the very best soil, compost, mulch and fertiliser. Then just plant your veggies and stand back.
The first step is deciding where the garden is going to go. Vegetables like a nice balance − a bit of shelter, a bit of shade and a decent amount of sun − so try to find a spot where they’ll get at least five hours of sun a day.
A reasonably level site is a good idea as well and, since it’s a fresh food garden, try to have it not too far from the kitchen.
Tools
- Spade
- Sledgehammer
- Tape Measure
- Spirit level
- Hammer
- Rake
- Garder fork and spade
- Wheelbarrow
- Shovel drill and drill bits (200x100 timber only)
- Socket set (200x100 timber only)
Materials
- Timber
- 100mm galvanised nails
- Sixteen 150x12mm Hex head coach screws (200 x 100 timber only)
- Pegs
- Vege Mix
INSTRUCTIONS
Timber size
Once you know where the garden’s going, work out what size you’d like it to be. You can go any size and shape but 2.1 x 1.8 metres is pretty common, partly because you’re dealing with standard lengths of timber but also because anything wider than 1.8 metres makes it a bit of a stretch to reach the plants in the middle of the garden.
On a garden this size, good, solid, 200 x 50mm planks will ensure the garden holds it’s shape and two planks each side will give you a comfortable 400mm working height.
A popular alternative to the 200 x 50mm planks are the big 200 x 100mm macrocarpa timbers used on the Mitre 10 Easy As online video. While these cost more and don’t make a better raised garden, they do create a great look. Like the smaller planks, they’re also available in the 2.1m and 1.8m lengths. A general rule-of-thumb is that two well-managed 2.1 x 1.8 metre gardens is just about right for a family of four.
Type of timber
There’s ongoing debate about what timber you should use to build a raised garden. An untreated hardwood like macrocarpa is rot resistant and looks great but you pay a premium for it. H4 treated pine is popular because it’s economical and you can buy it any where. Because it’s treated, it won’t rot either.
The debate is around whether the timber treatment chemicals will leach into the soil that you’re growing your vegies in. If you’re not comfortable with treated timber, you can staple polythene sheet around the inside of the planks as a barrier between the timber and soil. Just remember that good drainage is important for a raised garden so don’t run the polythene sheet over the bottom of the garden.
Site preparation
This is pretty simple. Once you’ve decided where your raised garden will go and what size it’s going to be, mark it out, grab your spade and skim off any grass and vegetation. You don’t need to take a lot - 20mm should get you down to bare dirt but you might find you’ll need to take a little more off in places to get your planks sitting even and level.
Handy hint: If your planks are a little curved and the top and bottom planks aren’t lining up perfectly (likely more noticeable on the longer planks), just nail a vertical batten to the inside halfway along and it will help pull everything into line.
Macrocarpa build: 200 x 100mm planks
Whatever size planks you use, the build process is the same apart from the fact that with the bigger timber, you screw them together rather than nailing.
Start by getting your bottom four planks in place, line them up and screw them together using 150 x 12mm hex head coach screws.
The screw holes have to be pre-drilled so you’ll need an electric drill and two different sized drill bits - one 25mm bit to countersink the head of the coach screws and one 12mm bit to pre-drill the holes below the head of the screw.
DO NOT drill the 12mm bit through into the end of the other timber you’re screwing into. The screw thread needs to bite into solid wood to hold firm but you can use a smaller drill (no larger than 8mm) to make screwing into place easier.You’ll also need a socket set with a socket that matches the hex head of your coach screws.
Get all four base planks into position and lined up, pre-drill your screw holes (including the countersinking for the hex heads of the coach screws) and screw together. Use two coach screws in each corner.
Measure corner-to-corner diagonally to make sure everything’s square. If not, just bump into line until it’s squared up and diagonal measurements match.
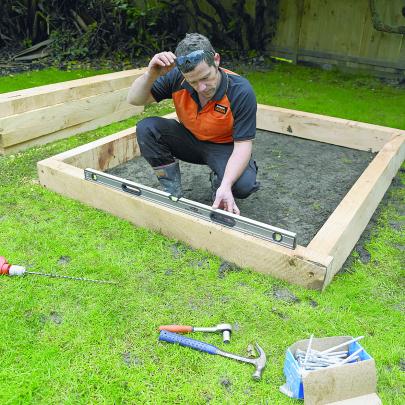
Run a spirit level along the top of each plank, use a spade to trim any high spots off the ground and once you’ve got everything sitting down level, you’re ready to repeat the process.
Put the top planks on, pre-drill, screw together, then just skew-nail the top planks to bottom planks in each corner.
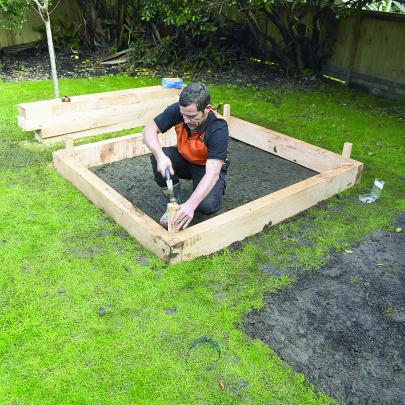
It’s not essential but for extra stability you can drive a wooden peg into each inside corner and nail it in place.
Standard build: 200 x 50mm planks
Going with the 200 x 50 planks will cost less, plus it’s quicker and easier because it’s nailed together rather than screwed. Otherwise the process is just the same.
Get your bottom four planks in place, line them up and nail them together using 100mm galvanized nails. Measure corner to corner diagonally to make sure everything’s square. Use a spade to trim any high spots off the ground to make sure everything’s sitting down level and you’re ready to put the top planks on. Nail them together, then simply skew-nail top and bottom planks together in each corner. For extra stability you can drive a wooden peg into each inside corner and nail it in place.
Get Growing
You’ve got the raised part of your raised garden sorted so now it’s time for the garden. Spread about six layers of old newspaper over the ground to help prevent weed growth, then wet down with a little water to hold the paper in place while you add soil.
The first layer should be green material such as green waste and the sod you removed when you were preparing the garden.
This green material will rot down and provide great worm food, attracting worms to your garden and creating nice rich soil.
Then cover your green waste with layers of potting mix and compost or make it even easier by simply filling with vegie mix (a garden mix and potting mix combo).
Aim to fill your raised garden up to about 50mm from the top, rake it level then decide what vegies you want to plant. − Text and images courtesy of Mitre 10.
NEXT SATURDAY:
How to build a fence.
VIDEO: www.mitre10.co.nz/guides-and-advice/guide/how-to-build-a-raised-vege-garden
Comments
Great! Just make sure to use clean topsoil for the bed. Soil sold as suited for vegetable growing may be contaminated with herbicide spray which may break down only very slowly (over years) once inside soil and will affect growth of plants sensitive to these poisons. We found out the hard way!


