Got a weekend to spare? A budding do-it-yourself type? Summer Times, in conjunction with Mitre 10, shows you how to build a deck . . .
MATERIALS
Timber piles (125mm x 125mm H5 treated Radiata)
Bearers (150mm x 50mm H3.2 treated Radiata)
Stringers (150mm x 50mm H3.2 treated Radiata)
Joists (150mm x 50mm H3.2 treated Radiata)
Decking (40mm H3.2 treated Radiata)
Pre-mixed concrete OR builder's mix and cement
Galvanised 100mm flathead nails
Galvanised U-nails OR galvanised steel strap with 30mm galvanised flathead nails for fixing
OR galvanised pile-to-bearer fixings with 30mm galvanized flathead nails Galvanised M12
diameter coach bolts (for fixing stringer to side of house)
Decking nails
TOOLS
String line
Hammer
Ruler
Tape measure
Pencil
Electric drill and set of wood boring bits
Square
Spirit level
Hand saw
Chisel
Adjustable spanner
Circular saw
Sledgehammer
Spade
insert diagram 1 here
INSTRUCTIONS
Select a datum point (a standard measurement point) _ generally the existing floor level. Set the finished deck level below this datum point.
In some situations the New Zealand Building Code requires a step down to an open framed permeable deck (your local authority or council will be able to advise you).
Determine a working height to set the profile boards. In our example, the deck profile boards are set at the top of the bearers and ledger (see diagram 1).
Identify the length of the deck along the wall of the house. From position A, string a level line through to position B (see diagram 1). At points A and B drive a nail or cup hook. From each point (A and B) run a string line at right angles. The string line should be the length of the deck plus 600mm (working clearance) for profile locations. Erect profile boards at the determined height. Set string lines for correct level and deck size (see diagram 1).
Check everything is square by using the 3-4-5 triangle method (see below) and equal length diagonals (see diagram 2). Do not damage string lines and check positions are consistently correct and taut.
Mark positions on existing house wall of solid framing for ledger bolt locations. Set ledger wall plate the length of A to B. Cut packers and shape to fit weatherboard or cladding angle if necessary (see diagram 3).
Lay bituminous damp proof coarse behind ledger packers. Fix ledger on packers to solid framing with 2 x M12 coach screws at a maximum spacing of 1.2 metres centre to centre (see diagram 3).
The New Zealand Building Code requires a minimum separation of 12mm between the wall cladding and a timber slat deck so that water will not become trapped. This separation can be provided by 12mm x 150mm long H3.2 packers at bolt fixings. Alternatively the junction between the decking and the stringer can be protected by the installation of weatherproof flashing.
The 3-4-5 triangle method To establish square, measure 300mm along one string line from the intersection where the string lines meet. Then measure 400mm along the other string line from the same point. Then measure on a diagonal between those two points. If the string lines are square, this measurement should be 500mm. If not, it will then need to be adjusted and re-measured until these measurements are correct.
Handy hint: Ear protection, eye wear and sturdy footwear should be considered the minimum requirement when using power tools and always use a residual current device when using electric power tools.
Spacing pile foundations (see diagram 6)
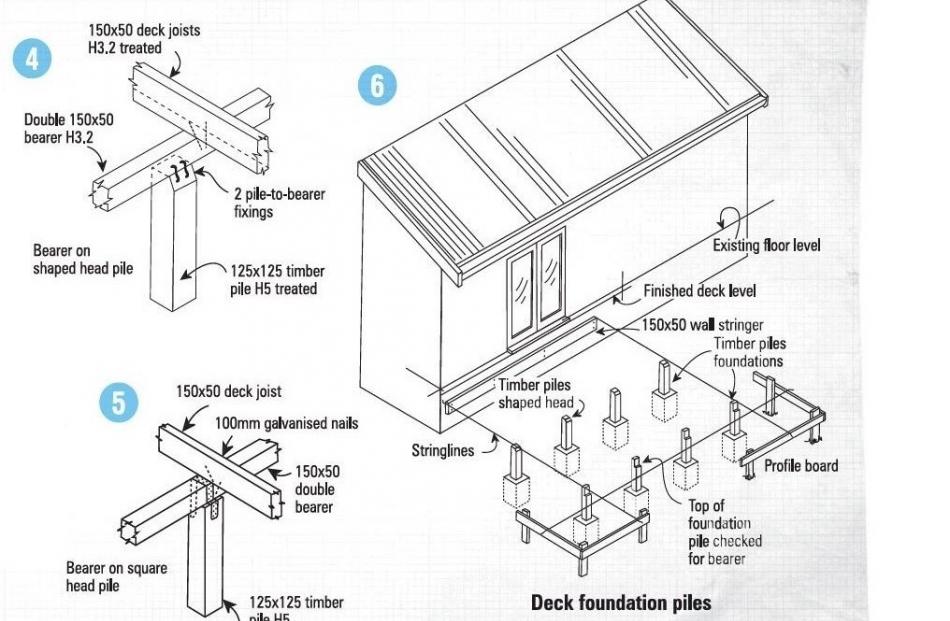
Run a string line between pegs or from profiles at the desired depth, width and length of deck. Locate corner piles and set out pile positions along string line and mark on the ground (see diagram 1). Piles should be spaced at maximum centres of 1.3m along the lines of the bearers and at maximum centres of 1.9m along the lines of the joists.
Dig holes with a post hole borer or a spade to a minimum depth of 450mm plus an extra 100mm for concrete pad. Clean out holes of any loose material. Place piles in holes on a concrete pad 100mm thick. Check for plumb with a spirit level and face alignment to within 1mm of string line.
Note: Constantly check alignment is square.
Tack temporary braces to pile and ground pegs for final position. Fill holes with concrete, taking care to ensure the post is vertical. The concrete may be bagged, pre-mixed, dry concrete or a 6:1 ratio of builder's mix and cement, mixed with water to a stiff mix. Compact the concrete into the hole around piles with a stick to remove air pockets. Leave the concrete to set around piles for at least 48 hours.
Position bearers
The double 150 x 50 H3.2 Radiata bearers on top of the shaped head pile are to be connected to the pile with two galvanised or stainless steel post-to bearer ties on each side. The exposed area on the head of the pile is trimmed at a 45 degree angle to prevent water from pooling on top.
Fix decking joists
Joists used here are 150 x 50 Radiata H3.2, spaced 450mm apart, centre to centre. Cut joists to length and square. Leave a gap where they meet the house to allow for moisture to drain away. Skew nail bottom of joist to bearers on each side (see diagram 3).
Lay decking
When laying decking boards, start from the furthest outer edge of the deck and work inwards. Create a 15mm setback from board edge to fascia plate. Check spacing as you go to ensure boards are square and running true to line (curved boards may be straightened using a suitable pry bar.) Butt boards hard up to each other to allow for shrinkage. The last board against the house may have to be scribed to fit and reduced in width. _ Text and illustrations courtesy Mitre 10.
For more information, visit:
https://www.mitre10.co.nz/guides-and-advice/guide/how-to-build-a-deck


