
Remember dinner time as a kid, when a plate of food was far more than just sustenance?
Broccoli florets were lush green trees, ready to be decimated by a stream of gravy erupting from a mashed potato volcano. A dinner plate was far from ordinary - it was a canvas.

As we grew up, the idea of playing with food became a distant memory, something childish and improper. But what if playing with your food is exactly what we should be doing - especially as adults?
We’re taught from a young age that mealtimes are a serious business, yet some of our fondest childhood memories come from those moments when we did get to play. Think about it: the mashed potato volcanoes, or the act of decorating cupcakes with wild swirls of icing and handfuls of sprinkles. It was fun, imaginative, and let’s be honest, made the food taste a little bit better. As adults, we often lose that sense of play, particularly at the dinner table.
However, introducing a little bit of artistic food play back into our daily routines could be just what we need.
While often seen as an activity for children, play is essential for adults too. It’s proven to relieve stress, improve brain function, and strengthen relationships.
Creating art with your food has the potential to trigger all these benefits, transforming an ordinary meal into a bonding experience. Even something as simple as arranging food in a playful way can bring back memories of childhood meals where creativity reigned.
Dinner is the perfect time for this, especially since it’s often the most social meal of the day. Whether with family or friends, turning your dinner into an edible canvas can add a splash of whimsy without a major shake-up to your routine. After all, adding a tomato sauce smile to your plate will add a hint of fun.
So don’t be afraid to experiment with your plate. Making a masterpiece of your salad or creating sculptures with your pasta isn’t just for kids. It’s a way to boost your mood and turn an everyday moment into something memorable.
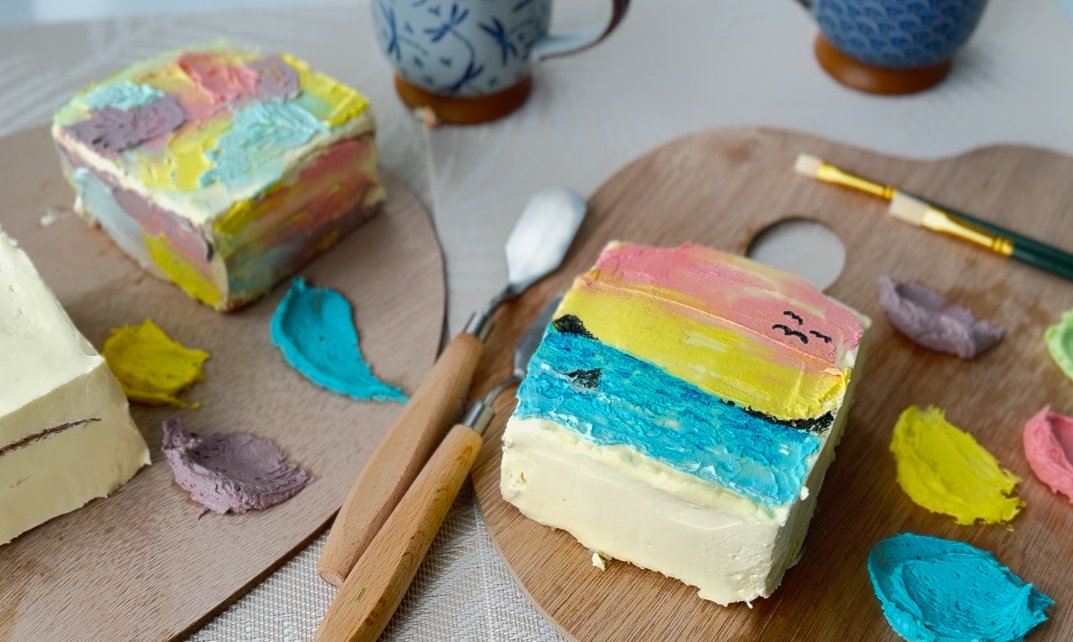
Paint a cake!
You may notice this recipe contains two different buttercream recipes - one made with butter and another made with a spread. This is because traditional buttercream sets solid in the fridge creating a nice sturdy base to "paint" on, while buttercream made with margarine maintains a soft workable texture even when cooled slightly, making it ideal to use as "paint".
Vanilla sponge cake
Ingredients:
1 cup caster sugar
200g softened butter
1 Tbsp vanilla essence
4 eggs
1½ cups self-raising flour
1 tsp baking powder
2 Tbsp milk
Method
Line a rectangle cake tin with baking paper, and preheat the oven to 180°C bake.
To make the cake batter, begin by adding the sugar, butter and vanilla to a large mixing bowl or the bowl of a stand mixer. Beat together until light in colour and fluffy.
Next, add each egg one at a time, beating the mix well after each addition. Make sure to scrape down the sides of the bowl as you mix.
Once all the eggs have been added, add the flour, baking powder and milk to the mix. Then, using a spatula, gently fold the dry ingredients in until fully combined.
Pour the mix into the lined tin and, using the spatula, spread the mix so it is evenly distributed. Place into the oven and bake for 25-30 minutes until it is golden on top and springs back when gently pressed in the middle.
Once the cake has been removed from the oven, gently lift it from the tin and place it on a cooling rack to sit until completely cooled.
When the cake has completely cooled cut it into whatever shape you like. I opted for 8 x 8cm squares but you could make them larger or smaller or even different shapes.
Buttercream for white base
Ingredients:
400g softened butter
2 cups icing sugar
2 tsp vanilla essence
Method
In a large mixing bowl, using an electric or stand mixer, beat the softened butter, icing sugar and vanilla together until light and fluffy. The icing should be so light in colour it looks white.
To ice your cake, using a metal knife (or a small staged palette knife if you have one) spread a thin layer of buttercream on each side and the top of the cake. This first layer is just a crumb coat, meaning a thin layer of buttercream to seal in the cake and prevent any crumbs in your outer layer.
Once finished it should look messy and unfinished - because it is! When your crumb coat has been applied, place your cakes in the fridge to allow the buttercream to set. This should only take a few minutes.
When the crumb coat is set, add a large dollop of buttercream to the top of the cake - be very generous, you’re going to end up scraping most of it back off to achieve a smooth surface!
Using a spatula gently spread the buttercream across the top of the cake, pushing excess over the sides to cover each side. Continue to spread the buttercream across all surfaces until the entire cake is covered in a thick messy layer of icing.
Once your cake looks like a big white blob, use the flat edge of a metal knife to scrape all excess buttercream off each side and top of the cake until each side has an even layer. To achieve a super smooth finish, heat your knife under some hot water and dry off before scraping.
Place the iced cakes in the fridge for at least 30 minutes before "painting" to allow the buttercream to set into a nice sturdy base.
Buttercream for ‘paints’
Ingredients:
250g Country Soft spread
100ml condensed milk
5ml vanilla essence
1½ cups icing sugar
Gel food colouring (use red, yellow and blue to create whatever colours you like)
Method
In a large mixing bowl, using an electric or stand mixer, beat the spread until smooth and creamy.
Gradually add the condensed milk and continue beating until well combined.
Add the vanilla essence and icing sugar in small batches, mixing after each addition. Continue to beat until the mixture is light, fluffy, and smooth.
Separate the buttercream into separate bowls. You should have as many bowls as colours you wish to use. Once separated, colour each portion of buttercream individually using gel food colouring.
Keep in mind the buttercream is white and therefore most colours will be a pastel hue. I do not recommend adding excessive amounts of the food colouring to achieve a stronger colour as this will make the buttercream split.
Once your "paints" are all ready to go, grab your cakes out of the fridge and go crazy. Use unused paintbrushes and palette knives to apply the "paint" in any way you like.

Pulled pork croquette Jenga with fresh tomato and apple salsa
For the croquettes
500g potatoes, peeled and chopped
30ml cream
2 Tbsp ground cumin
1 tsp smoked paprika
1 tsp salt
A pinch of cracked black pepper
300g pulled pork or leftover roast pork, shredded or finely chopped
50g grated cheese (any variety)
2 Tbsp parsley, finely chopped
2 eggs
50ml milk
700g breadcrumbs
300g flour
500ml canola oil (for shallow frying)
For the salsa
(This salsa is also used in the Mexican smash bowl recipe)
1 green or red apple, finely diced
Juice of ½ lemon or lime
3 medium tomatoes, finely diced
½ red onion, finely diced
½ red capsicum, finely diced
A handful of fresh coriander, chopped
2 Tbsp olive oil
½-1 tsp salt, to taste
Freshly cracked black pepper, to taste
Method
Prepare the mash: Boil the peeled and chopped potatoes in salted water until soft. Drain, then mash them with the cream, cumin, smoked paprika, salt, and pepper. Let the mash cool completely.
Once cooled, stir in the shredded pulled pork, grated cheese, and finely chopped parsley until well combined.
Spread the mixture evenly into a lined baking tray.
Freeze for 1-2 hours (or overnight) until firm. Once firm, allow to thaw slightly for 30 minutes, then cut into finger-sized rectangular pieces on a cutting board.
As you wait for the croquettes to thaw, prepare the salsa.
Begin by finely dicing the apple and immediately tossing it with the lemon or lime juice in a medium-sized bowl. This will keep the apple fresh and prevent browning.
Finely dice the tomatoes, red onion, and capsicum. Add them to the bowl along with the chopped coriander.
Drizzle the olive oil over the mixture and season with salt and freshly cracked pepper. Stir well to combine.
Taste and adjust the seasoning, adding more lemon or salt if desired.
To coat the croquettes, prepare three bowls: one with flour, one with beaten eggs and milk, and one with breadcrumbs. Lightly coat each croquette piece in flour, then dip into the egg mixture, and finally roll in breadcrumbs, ensuring an even coating.
Heat the canola oil in a deep frying pan over medium high heat. Shallow fry the croquettes in batches, turning until golden brown on all sides.
Once cooked, transfer them to a cooling rack to drain any excess oil.
To serve, stack the croquettes in a Jenga-like arrangement, with salsa.

Easy peasy smash Mexican bowls
Ingredients
Oil (for cooking and tortilla cups)
1 packet small/medium tortillas
1 tin corn kernels, drained
1 tin black beans, drained
½ tsp cumin
½ tsp paprika
Salt, to taste
Fresh coriander, roughly chopped
1 lime, cut into wedges
1 ripe avocado, sliced
1 packet pulled pork (pre-cooked)
1 packet pre-cooked brown rice
1 bag of slaw mix
Apple salsa (see recipe above)
Method
To prepare the tortilla cups, preheat your oven to 160°C (fan bake). If needed, cut the tortillas into smaller circles to fit your muffin tin.
Place the tortillas in the muffin tin, shaping them into cup-like moulds. Lightly spray or brush them with oil. Bake for 10-15 minutes, or until golden brown and crispy.
Transfer to a cooling rack.
In a frying pan, heat a little oil over medium heat. Add the corn and black beans, and sprinkle with cumin, paprika, and a pinch of salt. Saute until the corn develops a slight char. Remove from heat and set aside.
Roughly chop the coriander and set aside. Cut the lime into wedges. Slice the avocado into thin slices.
Heat the pulled pork in the oven until it reaches 75°C, then pull it apart with a fork. Heat the pre-cooked brown rice according to the packet instructions.
To assemble the bowls, start by adding a base layer of warm brown rice to your bowl.
On one side, add a heaped tablespoon of the sauteed corn and bean mixture.
On the opposite side, place a generous helping of slaw. Add pulled pork next to the slaw, followed by two slices of avocado. Top everything off with a spoonful of apple salsa, and garnish with fresh coriander and a lime wedge.
Once your bowl is fully assembled, grab your fork, knife, or spoon and smash everything together to create a colourful, flavourful Mexican salad on your plate.
Seasons - By Alison Lambert - Available for purchase now!

The Otago Daily Times and Alison have collaborated to bring you her first cookbook – Seasons.
This book is the ultimate year-round cookbook. Seasons is filled with versatile recipes designed to inspire creativity in the kitchen, offering plenty of ideas for delicious accompaniments and standout dishes that highlight the best of what each season has to offer.
$49.99 each. Purchase here.
$44.99 for ODT subscribers. Get your discount code here.


