Natalie Paull has established a reputation for melding the traditional pillars of cake baking with her distinct brand of irreverent innovation.
Her cafe and bakery Beatrix Bakes had a cult following before closing in 2022 as Paull set out to rediscover the joy in her baking journey.
Paull’s answer was to write a book, Beatrix Bakes: Another Slice, featuring favourite cakehouse recipes that did not make it into her first book, "recipes that were waiting to find their cake stand" and methods she had ignored then fallen in love with.
"There are bakes that felt like a life-support system at times.
"Writing about these cakes brings me to life. These recipes demand something of me — to keep finding ways to mix flavours, to sift, to fold and whisk. To beat and bake. They demanded that I find the light. They demanded that I remember who I am and why I do what I love to do."
She believes baking a lovely cake should not only be possible after hours of serious questing for esoteric ingredients.
"I believe most ingredients should be within everyday reach, and that your baking budget, without any quality shame should determine what you buy."
Ingredient labels are her obsession, and she uses the nutrition labels on products to provide knowledge about the fat, protein and water contents of ingredients. Using the percentages on the nutritional panels, and keeping these consistent, means the outcome of her baking is consistent too.
So in her book she includes information about the ingredients she uses the most, what some can be swapped for, how to store or use an ingredient and some tips on how she bakes using digital scales and is attentive to her oven temperature.
"Your baking instincts are the ultimate utensil. If you sense the cake or cookie is colouring too fast, listen to your inner baking genius and turn the oven temperature down a smidge. You will almost always be right about the perfect adjustment. Be present and watch, listen, smell and touch. Listen to your baking instincts. They are almost always right."
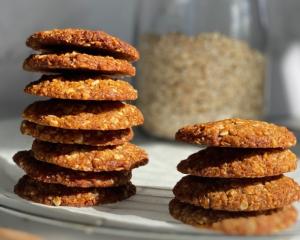
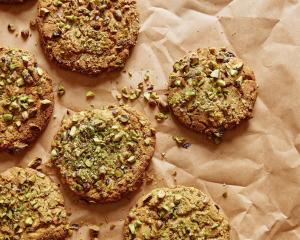
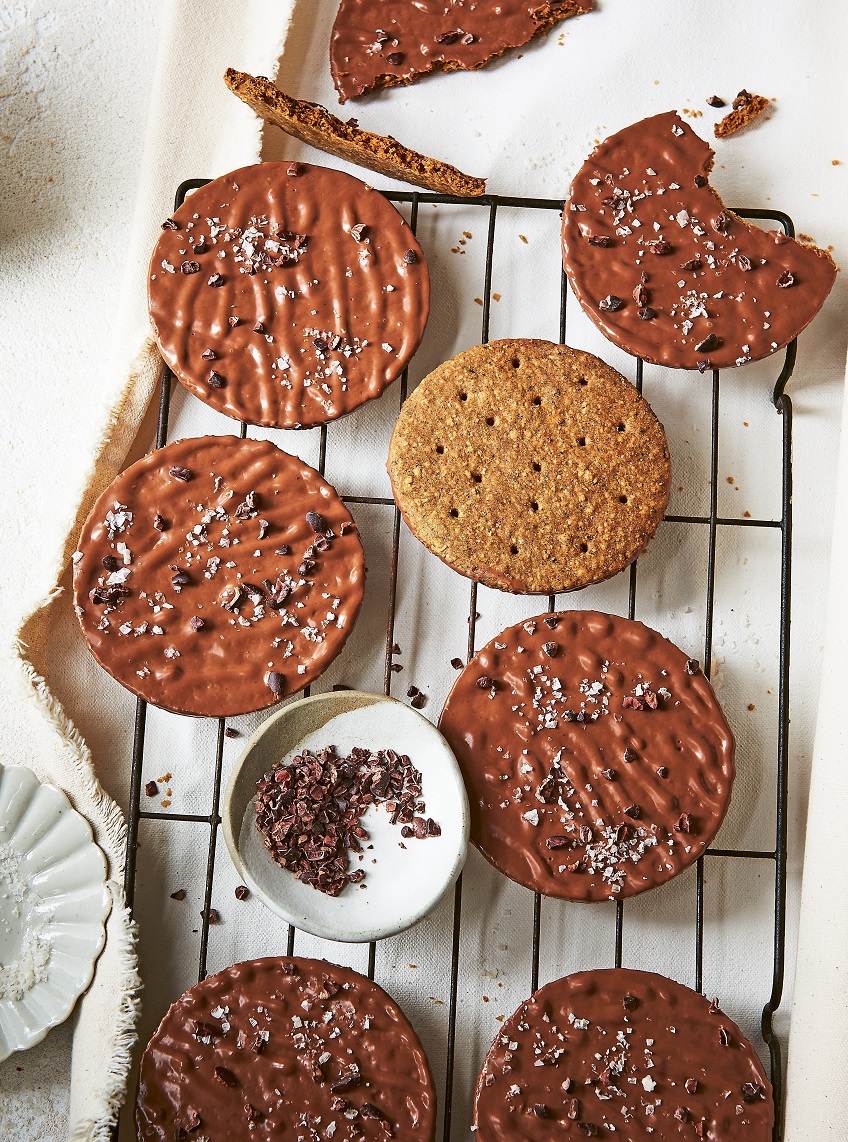 Milk chocolate and Earl Grey diges-tea-ves
Getting into my downtime comfort zone means three things: stretchy pants, a pot of tea and a packet of milk chocolate-covered digestives. Alas, commercial brand digestives are always saliva-sucking dry. So, I fixed it — the answer, as it so often turns out to be, is to add more butter. Streamlining two of my three loves by adding tea to the dough makes these extra special. Just seek a high-quality Earl Grey tea in leaf form with big bergamot energy, or simply say berga-no and leave it out altogether. Still unstoppable to eat!
Makes about 12 cookies, 10cm round
Earl Grey cookies
170g unsalted butter, cool and pliable
50g icing (confectioners’) sugar
15g molasses (or treacle)
7g (1½ heaped Tbsp) Earl Grey tea leaves (optional)
100g plain (all-purpose) flour
2g (¼ tsp) baking soda
2g (¼ tsp) baking powder
2g (¼ tsp) fine sea salt
100g wholemeal (whole-wheat) plain (all-purpose) flour
30g wheat bran
50g/ml buttermilk, cold cooking oil spray
Milk chocolate glaze
375g good milk chocolate (30%-plus cocoa)
20g neutral coconut oil or butter
3g (¼ tsp) vanilla paste
To finish
10g cacao nibs
3g (heaped ½ tsp)
sea salt flakes
Method
Weigh the butter, icing sugar and molasses into the bowl of an electric stand mixer. Using the paddle attachment, beat on speed 4 (below medium) for about 10 mins until malty, brown and thickly creamy — not fluffy and aerated. Scrape down the bowl with a stiff spatula a few times.
Grind the Earl Grey tea leaves, if using, to a fine powder — a spice grinder or mortar and pestle is best. Sift the plain flour with the baking soda, baking powder and salt, then add in the ground tea leaves, wholemeal flour and wheat bran and give them a swizzle with your fingers to combine.
Give the creamed butter base a final and thorough scrape down. Tip the dry ingredients in and beat on speed 1 (low) for 30 seconds, until the mix changes from floury to a brown and nubbly crumble mix.
Still on speed 1 (low), pour in the buttermilk and mix until the dough clears the sides. Take the bowl off the stand mixer and scrape the dough on to a lightly floured work surface. Lightly knead to incorporate any buttery or buttermilky seams back into the dough.
Form the dough into a fat disc, cover in plastic wrap, clasp and massage the sides to smooth any cracks, then chill for a minimum of 3 hours before rolling.
To bake, preheat the oven to 140°C . Line two shallow baking trays with cooking oil spray and a piece of baking paper to fit. On a lightly floured surface, roll the dough disc out to about 35cm × 35cm and 4mm thick. Use a 10cm round cutter to stamp out the cookies and place evenly but not too far apart on the baking tray — these folks aren’t super spreaders.
If the cookies stick to the work surface, shimmy an offset spatula underneath to loosen them. Collect the scraps and roll again. Repeat the process with the remaining portion of dough to give you 12-14 cookies. You can re-roll once more — these might shrink a smidge.
You can dough your own way here: use thicker dough ( just add extra baking time) or a fluted cutter.
Prick each cookie with the flat bottom end of a wooden skewer for distinctive dimples — about 12 per cookie.
Bake for 30-35 mins until set (when you can easily lift one up). The colour should be a deep flush of tanned brown, and they’ll smell like toasted wheat — like freshly baked bread crust.
Turn the oven off, keep the door ajar with a folded tea towel (dish towel) and allow the cookies to cool and crisp slowly for 20 mins.
When the digestives have cooled, start the glaze by melting the milk chocolate, coconut oil and vanilla paste in small bowl set over a double boiler on a bare simmer.
Dipping consistency is like tuning an instrument but instead of pitch, you want to control temperature. If the dip is too warm and runny (the chocolate layer will be too thin), pause and allow the chocolate to cool down. You can always re-dip the first cookie when the dip is cooler and thicker. If the glaze starts to thicken while dipping, stop and ‘re-tune’ by heating the chocolate slightly over the double boiler.
In cold kitchens, I take the double boiler with the bowl on top to my bench to maintain a nice dippy texture from first to last cookie.
Holding your cookie firmly with the top/dimpled side up, push it into the dip so the chocolate just covers the edges.
Pull the cookie out and shake it vigorously to remove excess chocolate.
This shake also gives the chocolate a gentle rippled appearance.
Return the cookie to the baking tray with the chocolate side up. Working efficiently, dip the remainder of the cookies.
Drop a pinch of cacao nibs then some salt flakes across the top of each cookie. Allow the chocolate to set at cool room temperature for 1 hour; chill if it’s summer or you are working in a warm kitchen.
If the chocolate has set too firm for the cacao and salt to stick, heat with a blowtorch or warm them VERY briefly in the oven.
Notes
- Takes 30 mins to make the dough, plus 3 hours’ chilling time. One and a half hours to roll, bake, cool and dip. Another hour for the chocolate to set.
- Keeps: Baked and dipped — a week in an airtight container. Keep chilled in hot weather.
 Flourless chocolate cake
Satisfyingly fudgy (like the softest chocolate bar you ever did eat), this is my one true flourless cake love, with no gluggifying almond meal to corrupt the chocolate clarity. I have co-opted the late lactic acid addition from Bourke Street Bakery’s cake (they use yoghurt, but of course I reach for crème fraîche) to brighten up the chocolate. Take the cake out of the oven as soon as it is baked and let it drop with more drama than Meryl. To accentuate the cocoa caldera, I pile on billowy crème fraîche whip and juicy, syrupy sumac blackberries or spiced grilled blood plums. I also love to serve it with a generous jug of vanilla malt crème anglaise. Even with only a bare dusting of cocoa power, it’s another walk-by cake – I find myself trimming small slices off it each time I pass it in the kitchen until it has been whittled away (always too soon) to a plate of dark, moist crumbs.
Makes A cake to serve 6-10 people.
Ingredients
cooking oil spray
150g unsalted butter
140g good bittersweet chocolate (50–60% cocoa)
140g good milk chocolate (30%-plus cocoa)
140g egg yolks (from about 7 eggs) +
210g egg whites (from approx. 7 eggs)
100g dark brown sugar
2g (œ tsp) sea salt flakes
70g Dutch (unsweetened) cocoa powder, plus extra for dusting
90g crème fraîche
3g (heaped¼ tsp) cream of tartar
140g caster (superfine) sugar
Method
Preheat the oven to 160°C. Spray the base and side of a 20cm × 7.5cm round cake tin with cooking oil spray. Place 10cm tall baking paper strips along the tin wall, using cooking oil spray to seal the strips where they overlap. Place a snug paper circle on the base.
Make a double boiler by filling a saucepan with 5cm of water and bring to a low simmer on the stove. Chop up the butter and place with the chocolates in a 35cm heatproof bowl, then place over the pan. Heat until the chocolate and butter have just melted, stirring occasionally with a balloon whisk. Keep the mix warm – I usually turn the double boiler off but leave the bowl on top until I’m ready for the next step.
The temperature of the batter components is crucial: overheat the chocolate base and it will look like thick, oily lumps. You can keep using it – the cake will just bake flatter and denser.
If the chocolate base is too cool, it will firm up by the time the whites are folded in, requiring more vigorous (air-killing) folding – 70°C is ideal!
While the chocolate melts, start the egg yolk foam. Whip the egg yolks, dark brown sugar and salt in the bowl of an electric stand mixer with the whisk attachment on speed 8 (under high) for 5 minutes until pale brown and thick.
If you are a one-bowl house (like me), scrape the foam into a small mixing bowl.
Weigh the cocoa into a small bowl and set aside with a sieve for later.
Weigh the crème fraîche into a container to heat it in (stovetop or microwave) and set aside for later.
Clean the stand mixer bowl well and put the egg whites and cream of tartar in.
Using the whisk attachment, whip on speed 8 (under high) until the whites have changed from foamy to stiff and white – around 2-3 mins.
Start adding the caster sugar to the whites – VERY gradually – about a heaped tablespoon every 30 seconds, so the whole process takes around 3-4 mins.
It is imperative to the success of the cake that the meringue is very stiff and shiny. Reduce to speed 1 for 1 minute at the end to even out the air bubbles.
While the final sugar is being added to the meringue, return to building the chocolate base. Check your chocolate/butter mix is quite warm, then fold in the egg yolk foam. Sift over the cocoa powder and fold in. Heat the crème fraîche until melty/steamy (it doesn’t matter if it looks curdled) and fold that in too. Finally, fold in one-third of the whipped meringue. When the first addition is almost completely incorporated (still streaky), fold in the remaining meringue until very few streaks remain. Do a final fold with a clean flexible plastic spatula to eradicate any final streaks. The mix should look fluffy, like chocolate mousse.
Scrape the batter carefully into the lined tin. Smooth the top with an offset spatula.
Adding the second portion of whites/meringue before it’s completely incorporated maintains more air overall.
Concentrate on making the batter streak-free after the final whites addition.
Bake for 45-55 mins. The cake is cooked when there are puffed cracks at the edges, the top is matte dark-brown and a poke of the tin produces a firm-set wobble (internal temperature 80-85°C).
If you are using a skewer to test the cake, there will be batter on the skewer but it will look gooey, not liquid.
Remove from the oven and cool for a minimum of 2 hours (warm and fragile) or overnight (more set) before gently inverting the cake on to a cooling rack and then re-inverting it on to a cake stand. Dust with the extra Dutch cocoa.
If leaving overnight to cool, drape a clean, dry tea towel (dish towel) over the top and leave at room temperature.
I love this cake the most when it has matured overnight. A cute little waist may form on the side of the cake if the cake is removed from the tin while too warm – totally natural as it is totally flourless. Allow the cake to cool in the tin overnight for a reduced waist.
Overcooked cake will still be servable – just send to the table with some extra cream and juicy berries. Undercooked cake should have a sturdy wall around its too gooey centre. Serve as a molten chocolate pudding cake!
Notes
- Takes about 1 ½ hours to prepare and bake, then 2 hours to cool.
- Keeps: Up to 2 days at room temperature, covered; then chill for up to a week. Can be frozen up to 3 months.
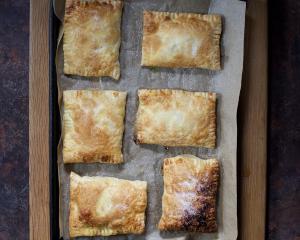
 Chocolate, rum and maple pecan pie
In the eye-searingly schmexy first season of the TV show True Blood, a tragedy befalls Sookie Stackhouse and, in her grief, she consumes a slice of pecan pie that I will never forget seeing. The maple custard was spoonably gooey under the pecan raft, and I vowed to make the pecan pie I made look the same. Like Sookie and her two paramours, I am torn between a classic recipe or adding the darker flavours. Here, I choose dark.
Serves 6–10
Ingredients
½ x Super flaky buckwheat crust (not gluten free)*
225g plain (all-purpose) flour
135g buckwheat flour
2g (¼ tsp) fine sea salt
225g unsalted butter, cold and sliced into small tiles 2cm square and 5mm thick
110g/ml iced water
20g egg yolk (from approx. 1 egg)
Filling
180g whole pecans
280g/ml pure maple syrup
160g demerara sugar
150g egg (approx. 3 eggs)
20g egg yolk (from approx.
1 egg, reserving white to seal the tart shell)
100g unsalted butter, super soft
60g/ml cream (35% milkfat)
20g/ml dark rum (or extra maple syrup)
15g Dutch (unsweetened) cocoa powder
5g (½ tsp) vanilla paste
4g (1 tsp) sea salt flakes
To finish
200g/ml thick cream (45% milk fat)
10g/ml dark rum (optional)
3g (¼ tsp) vanilla paste
teeny pinch of sea salt flakes
Method
For the pastry, put the flours and salt in a wide mixing bowl. Using your fingertips, rub the butter into the dry ingredients just until the butter lumps are the size of whole almonds and the surrounding flour feels like silky almond meal with buttery lumps.
These large butter lumps are going to melt during baking, creating steam, which will flake the pastry apart unbelievably!
Combine the iced water and egg yolk together and then add to the buttery flour. Keep mixing with your hands, lightly squeezing the dough together, until it looks like crumbly/shaggy playdough. Wrap the dough lightly in plastic, then flatten, by squeezing, into a 2cm thick round disc with smooth sides.
Chill this dough for a minimum of 1 hour or up to 2 days – just ensure the pastry is nicely pliable before rolling.
For a 23cm tart or pie dish, roll out half the dough to a 35cm circle, about 3-4mm thick. Trim to a smooth-edged 32cm circle, then gently lift and flop the dough in to the tin. Trim cracked edges before lifting the circle. The movement can exacerbate the cracks.
Working in sections, tuck the dough right into the corner and against the side of the tart tin to prevent air pockets, then use your fingers or rolling pin to push/trim the excess dough off the top. Freeze for at least 1 hour before blind baking.
Hold a little of the excess dough to patch any cracks after blind baking. With the remaining offcuts, stack and press together. They can be re-rolled twice.
To blind bake, preheat the oven to 200°C.
Cover the frozen dough with aluminium foil (dull side down), tucking it snugly into the corner of the tin. Fill the lined tin with about 750 g caster (superfine) sugar. Place in the oven, then reduce the heat to 165°C and bake for 50-60 minutes. Remove the foil and bake for another 5-10 minutes so the base crust is a biscuity brown colour.
For the filling, heat your oven to 130°C and scatter the pecans on to a shallow baking tray. Bake for 25-30 minutes until they’re just starting to darken on the outside and are the palest brown inside – cut or snap one open to assess. Set 20g aside for the end decoration and use the rest for the filling. Keep the oven on 130°C and set a rack on a low shelf and remove the upper racks.
Set up a double boiler: heat 5cm deep water in a 20cm saucepan to a low simmer and choose a heatproof bowl large enough that the base won’t touch the water when resting on top of the saucepan.
Weigh all the remaining ingredients, except the pecans, into the bowl and whisk together thoroughly. The butter and cocoa will be lumpy but all will melt and combine together as it heats.
Set the bowl over the double boiler and whisk occasionally until the mix thickens and the chocolate and butter melt. This should take around 10 minutes. The mix will read 55-60°C on a digital thermometer, and will look like a lustrous brown milkshake.
Take care it doesn’t overcook and get chunky/curdled at any stage. Scrape the filling into a jug.
If the mix does start cooking firm at the edge, act fast. Take the bowl off the double boiler and whisk vigorously to release the steam and regulate the temperature.
If the mix gets very overcooked, strain out the cooked egg chunks and whisk the drained filling into a fresh whole egg.
Place the blind-baked crust, still in the tin, on a shallow baking tray.
If there are any large cracks or dipped sides, soften some leftover dough and gently patch any large fissures – taking care not to press hard and break the crust.
Meticulously brush a light layer of the egg white on the inside of the tart to seal any fine cracks, then bake for 3 mins to seal.
Bring the tart crust back out and crush the toasted pecans with force in your hands while letting them fall on to the base of the crust. Par-crushed pecans give the top a nougatty texture and make cutting the tart easier than whole pecans.
Return the crust to the oven. Keeping your eye on where the crust edge is lowest, carefully pour the filling into the crust, being careful not to overfill.
Tease the pecans back up to float on the surface with your finger or a spoon, ensuring there are no pecan-less gaps on the top.
Bake for 50-60 mins. The wobble check is different for this pie because of the crusty nut raft: touch the top of the pie to feel how cooked it is below. If liquid and jiggly, bake longer.
Gently peel off a pecan from the centre to check underneath – it will look like a stable yet soft cream. There should be gooey residue on an inserted skewer (85°C).
Cool at room temperature for a least an hour (two is good) or chill for a chewier bite. To finish, whip the cream with the rum, vanilla and salt and pile on to the centre of the cooled pie. With an offset spatula, gently spread the cream over the pie, leaving a 6cm border all around. Hold a handful of the reserved toasted pecans in your fist and crush them as you let them fall on to the cream (just like the filling).
To serve, saw gently through the cream, pecan top and side crust with a fine serrated knife, clean the knife, then cut through fully along the slice line to cut through the base.
* The other half can be frozen (unbaked) for 3 months.
** The pie police may imprison me for this but if you break the crust pre-fill, pop to the shop and buy a ready-baked pastry case/crust and continue your pie project. This filling will glorify any Plan B crust.
Notes
- If the crust has been blind baked, this will take 90 minutes to make and bake. Cool for a minimum of 1 hour before cutting.
- Room temperature (without cream) the first day then up to 4 days, chilled.
 THE BOOK
This is an edited extract from Beatrix Bakes: Another Slice by Natalie Paull Hardie Grant Books, RRP $50.
Photography: © Rochelle Eagle 2024