Spring is in the air. Not only are the days getting brighter and warmer, but the evenings are becoming blissfully lighter.
Produce is starting to grow and we get to add new flavours and textures to our meals.
It also means that we can lighten up our meals by eating differently.
I enjoy eating small plates of food and having a bit of fun with it.
Small plates can be as simple as a wedge of good cheese, with a few walnuts or perhaps a bowl of steamed cockles.
I have created a varied little menu with some inspiration from my travels.
If you’re going to get outside, socialise and eat, then do it with style this spring.
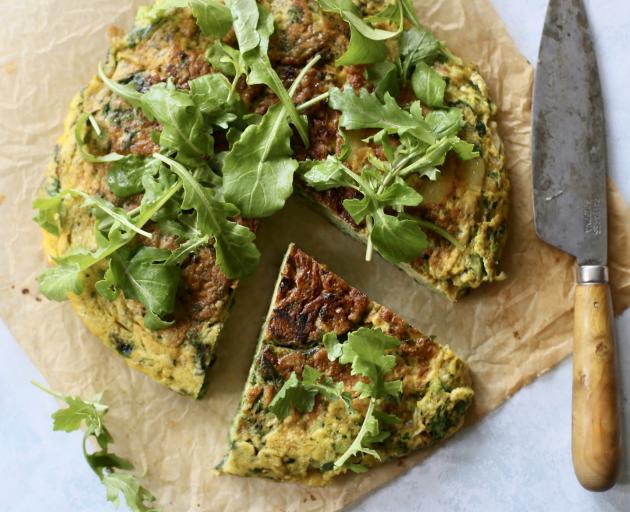
Potato and spring leaf frittata
I am constantly rummaging around in my garden to see the new growth. Slow as it is at the moment, I did notice the softer herbs and leaves are filling out.
These soft, fragrant herbs, like chives, parsley, dill and roquette are great added to salads to finish soups, or folded into an omelette or in this case a more substantial frittata.
Frittatas are such a quick and healthy option, great for lunch and for a lighter dinner.
SERVES 6-8
¼ cup olive oil
200g potatoes, peeled, cut into 4mm thick slices
2 onions, sliced thinly
6 large eggs
⅛ tsp salt
Freshly ground pepper
50g spring leaves, roquette, spinach, kale
Large handful garden herbs such as parsley, chives, dill, roughly chopped
2 Tbsp freshly grated parmesan cheese
Method
Add the oil to a medium-sized frypan. Over a moderate heat add the sliced potatoes and onions and cook until tender; you do not want them to brown too much. If this does occur, adjust the temperature and continue cooking (10 minutes).
Whisk the eggs in a large bowl, add the herbs and leaves, season with salt and pepper.
Drain the potatoes and onions from the oil. Return the oil to the frypan and put the cooked potatoes into the egg and herb mixture. Gently stir to combine.
Heat the oil up and pour in the egg mixture. Using a spatula, gently move the outside of the mix into the centre and let the runny egg mix fill the gap. This helps speed up the cooking.
Allow the egg to settle now and set over a low heat.
Place a large plate over the pan and carefully flip the frittata on to the plate. Slide the frittata back into the pan and cook for a further 2 minutes. You do not want to overcook it, as it is best eaten moist.
Turn out on to a plate. It is best eaten at room temperature.

Potato flautas
If you are not familiar with these Mexican delights then let me shed a little light on them.
They are basically corn tortillas filled with mashed potato, rolled up and fried, dressed with a crisp salad, salsa and cheese.
I realise it is likely not authentic but I make these with all sorts of fillings. I use leftover mashed potato and sometimes sweet potato. I have added cooked bacon or chorizo to the mix, flaked cooked salmon, corn - the options are endless.
MAKES 8
3 (300g) large boiling potatoes
1 egg
Salt and ground pepper
8 small corn tortillas
Oil for frying
300g iceberg (cos) lettuce, shredded
1 small onion, sliced thinly
50g feta (or similar) cheese
Olive oil and fresh lime
Method
Peel and cut the potatoes into bite-sized pieces. Place into a medium-sized saucepan, cover with water, ½ tsp salt and cook until tender (20 minutes). Drain.
Mash the potatoes until smooth, add the egg, salt and pepper and stir well to combine.
Spread the mashed potato so it resembles a sausage shape across the tortilla and roll up. They need to be roughly 2cm in diameter. Secure with a toothpick to prevent it unrolling.
Heat enough oil in a suitable-sized frypan so it comes up to about 1cm in depth.
Place in the flautas, being careful not to overcrowd the pan. Turn the flautas over so they are crisp on sides (8 minutes). Remove and drain on kitchen paper. Continue cooking the remainder. Remember to remove the toothpicks!
Serve with the shredded lettuce and sliced onion, crumble over the cheese, drizzle over a little oil and squeeze of lime.
Enjoy.

Chorizo croquettes
Croquettes are served throughout Spain and they make such a tasty snack.
They are traditionally made with a roux base and flavourings added to that, then crumbed and fried.
Perfect to serve as an appetiser to celebrate spring with your friends.
MAKES 24 SMALL BALLS
300g of fresh chorizo
30g of olive oil
50g of butter
1 onion
100g flour
1 litre whole milk
Ground black pepper
Ground nutmeg
1 cup flour
2 eggs whisked with ½ cup milk
200g breadcrumbs for coating (approx)
Oil for frying
Method
Peel the chorizo and chop into small pieces.
Add the oil and chorizo to a medium-size saucepan and cook gently to release the smoky oil.
Add the butter and diced onion and cook gently together until the onion has become translucent and sweet.
Sprinkle over the flour and stir to combine, cook out the flour for at least 5 minutes.
Gradually add the milk, stirring constantly to avoid lumps, continue until all the milk has been added. Continue cooking until the mixture thickens and starts to come off the sides of the pot.
Season to taste, add the nutmeg.
Pour on to a tray, cover with plastic wrap and chill until cold.
Have a clean tray nearby and three dishes. Place the flour in one, the egg mixture in another and in the third the breadcrumbs.
Dampen your hands, using a tablespoon, scoop some mixture, roll in your hands to form a ball. I find it easier to roll all the croquettes first before crumbing.
Coat in the flour, egg and finally breadcrumbs. Place on to a clean tray and continue until all the croquettes are crumbed.
Heat a medium-sized saucepan filled with enough oil to deep fry the croquettes until golden (8 minutes). Drain and continue cooking them in batches.
If you have too many they freeze well. Place on greaseproof paper in a container and freeze for up to 3 months.

Aranicini
I have been sampling arancini a lot lately. Some are round like little oranges and some have a more triangular shape.
But the one thing that they do have in common is the rice and texture, which is similar to risotto.
However, the filling can range from ragu, to cheese or both if you want.
What is also great is that arancini can be made with leftover risotto and if, like me, you like to mix up the fillings then go for it!
MAKES 12
25g butter
1 Tbsp olive oil
1 white onion, finely diced
100g celery finely diced
200g of risotto rice
600ml of vegetable stock
50g of butter
50g of Parmesan, grated
50g of feta cheese
100g of mozzarella cheese
Salt and white pepper
½ cup flour
Pinch turmeric
water
300g fine breadcrumbs (approx)
2 litre oil for frying
Method
Add the first measure of butter and oil to a heavy-based large saucepan.
Add the diced onion and celery and sweat off without colouring for 5 minutes.
Add the rice and stir to coat well in the butter mixture. Cook for 3-4 minutes.
Add the vegetable stock, stir well and simmer until the rice has absorbed the liquid and is very tender. You want the rice to be very soft, it will hold together better.
Stir in the butter and parmesan. Adjust the seasoning.
Cool on a tray.
When cool, lightly dampen your hands with water, divide the rice into 12 even-size piles.
Depending on the shape whether you decide on rounds or triangular the process is pretty much the same.
Mix the feta and mozzarella together and put to one side.
Flatten the rice portion in your hand, fill with a little cheese mix and bring the rice around the filling. Ensure that it is well sealed and adjust the shape. Continue until you have finished.
Mix the flour, pinch of turmeric together in a deep bowl, add enough water to form a ‘‘pouring cream’’ consistency.
Place half the breadcrumbs into a dish.
Dunk the arancini into the flour mixture, taking care not to break them open. Coat well then place into the breadcrumbs and coat well. Add more breadcrumbs as needed. Continue until finished.
Heat the oil in a deep-sided pot until 180degC. Test a little piece of bread and if it sizzles immediately then it is ready.
Place 2-3 arancini at a time (if they fit) into the hot oil. Cook until golden and crisp. The internal temperature should reach 70degC and above as you want the cheese to melt.
Serve immediately.